

Flow Cytometry Panel Design Tool
Sudoku puzzles seem to be all the rage.
I see it in coffeehouses, at the airport, even in doctors offices. Everyone is trying to work out how to fit the numbers into the grids so that everything adds up properly.
Designing polychromatic flow cytometry panels is much like the Sudoku puzzle.
In this case, the grid is composed of the antigens on one side, and the cytometer detectors on the other.
The goal is to fill in the grid correctly.
Instead of adding up to 45, like in Sudoku, the flow cytometrist is trying to optimize the ability to make a sensitive measurement to answer the biological question the researcher has set out to answer.
Solving the Polychromatic Sudoku puzzle, so to speak, is easy if you follow a few simple steps.
Step 1: Establish a biological hypothesis.
Everything starts with understanding what the biological hypothesis for the experiments to be performed. This will dictate what populations need to be identified, and what information needs to be extracted from the data.
As you proceed, rank your antibodies based on cellular expression level and importance in answering the biological hypothesis.
For example, CD3 is a highly expressed antigen on T-cells and is important in making primary gating decisions, while CD86 is a dimly expressed (or emergent) marker on cells undergoing activation and may be critical to answer the biological hypothesis.
Step 2: Research your fluorochromes.
Fluorochrome brightness can be measured and the different fluorochromes ranked against each other.
Use a chart like this one from BioLegend where fluorochromes are ranked from brightest (5) to most dim (1).
Based on the brightness of fluorochromes and the expression density of the antigen on the cells, we want to pair highly expressed antigens (like CD3) with dimmer fluorochromes (1-2), while lower expression antigens are paired with brighter fluorochromes (4,5).
Step 3: Know the instrument you're using.
Aim to understand your flow cytometer before designing your antibody panel. Pay particular attention to where the most sensitive measurements can be made on the system. Everything doesn't boil down to just fluorescence intensity.
Sometimes, it is better to use a less bright fluorochrome if… if the channel does not receive a lot of error.
Below is an example Excel analysis of the spillover of fluorochromes into different detectors on a 4-laser instrument (405, 488. 532. 633). Summing across results in the error that that a given detector receives from the flurorchromes in the panel. Summing down the columns results in the amount of error a given fluorochrome contributes to the panel in question.
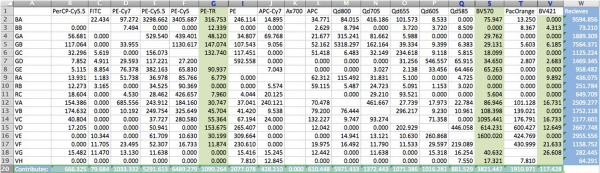
These data are based on the calculations found in Nguyen et al. (2013) Cytometry A 83A:306-315
Using the above analysis, one can make an informed decision where the best fluorochrome choices are to make sensitive measurements.
Step 4: Use a panel building program.
It becomes critical to find all the antigen-fluorochrome pairs that are available.
While it is possible to search through catalogues and use Google, there are packages out there that can be used to help this process, for example:
Chromocyte – a web-based system panel building system and a resource website.
Fluorofinder – a new resource with a web-based interface for panel building.
With these tools, the searching for reagents becomes easy, leaving time to build the panels using the theory described above.
Step 5: Optimize your panel.
After all is said and done, the panel must be optimized and validated. Proper antibody titration, the correct voltages, optimized staining protocols to minimize non-specific binding and such are all part of the long, but very critical process to ensure that the panel works appropriately.
Step 6: Bring on the OMIP.
OMIP is short for Optimized Multicolor Immunophenotyping Panel, which is a peer-reviewed, optimized flow panel. The beauty of the OMIP is the work is already done for you, including the antigens to be used, the fluorochromes, and the analysis template.
There are currently over 23 OMIPs, all of which can save you the headache of building a panel from scratch.
Of course, there are still an uncountable number of antibody panels for which no OMIP exists. If you're designing a new antibody panel, or are stuck after several attempts to optimize a existing panel, get expert help. Don't keep wasting time and resources on an incorrectly designed panel.
To learn more about automatic compensation and to get access to all of our advanced materials including 20 training videos, presentations, workbooks, and private group membership, get on Mastery Class wait list.

Flow Cytometry Panel Design Tool
Source: https://expert.cheekyscientist.com/flow-cytometry-antibody-panel/
Posted by: salinasgise1989.blogspot.com
0 Response to "Flow Cytometry Panel Design Tool"
Post a Comment